Today, I thought I would share a recent commission project I just finished. I have a friend, Aurelia,who is an artist at Noyes Art Gallery where I display my art. She asked me to redo her bar, which was in her studio. Originally she wanted all the squares to look the same so it wouldn't be too busy. Of course, that just sounded too tame to me. I mean, who wants the same polkadots or stripes on every single square? After visiting further, she said , "You just do it however you want to do it. I love my bedroom set so much!" (I had done a bedroom set a couple of years ago for her.)
Hmmmm... free reign.... We talked about doing a mural of some sorts on it, but when I went to visit it again, the bar's squares were much more detailed than I remembered!! It immediately cried out to me to cover the "D" in the center of the diamond..I knew that much!
This is a story of how this blah white bar went from this

to this.

So how did this dull white bar, with a big "D" in the center get a face lift?
In this picture, you can tell I filled in the "D" with wall spackling. It took several applications but it was finally smooth, .......and then I couldn't decide what to do with it! So I just left it until the last. Procrastinate..my middle name..
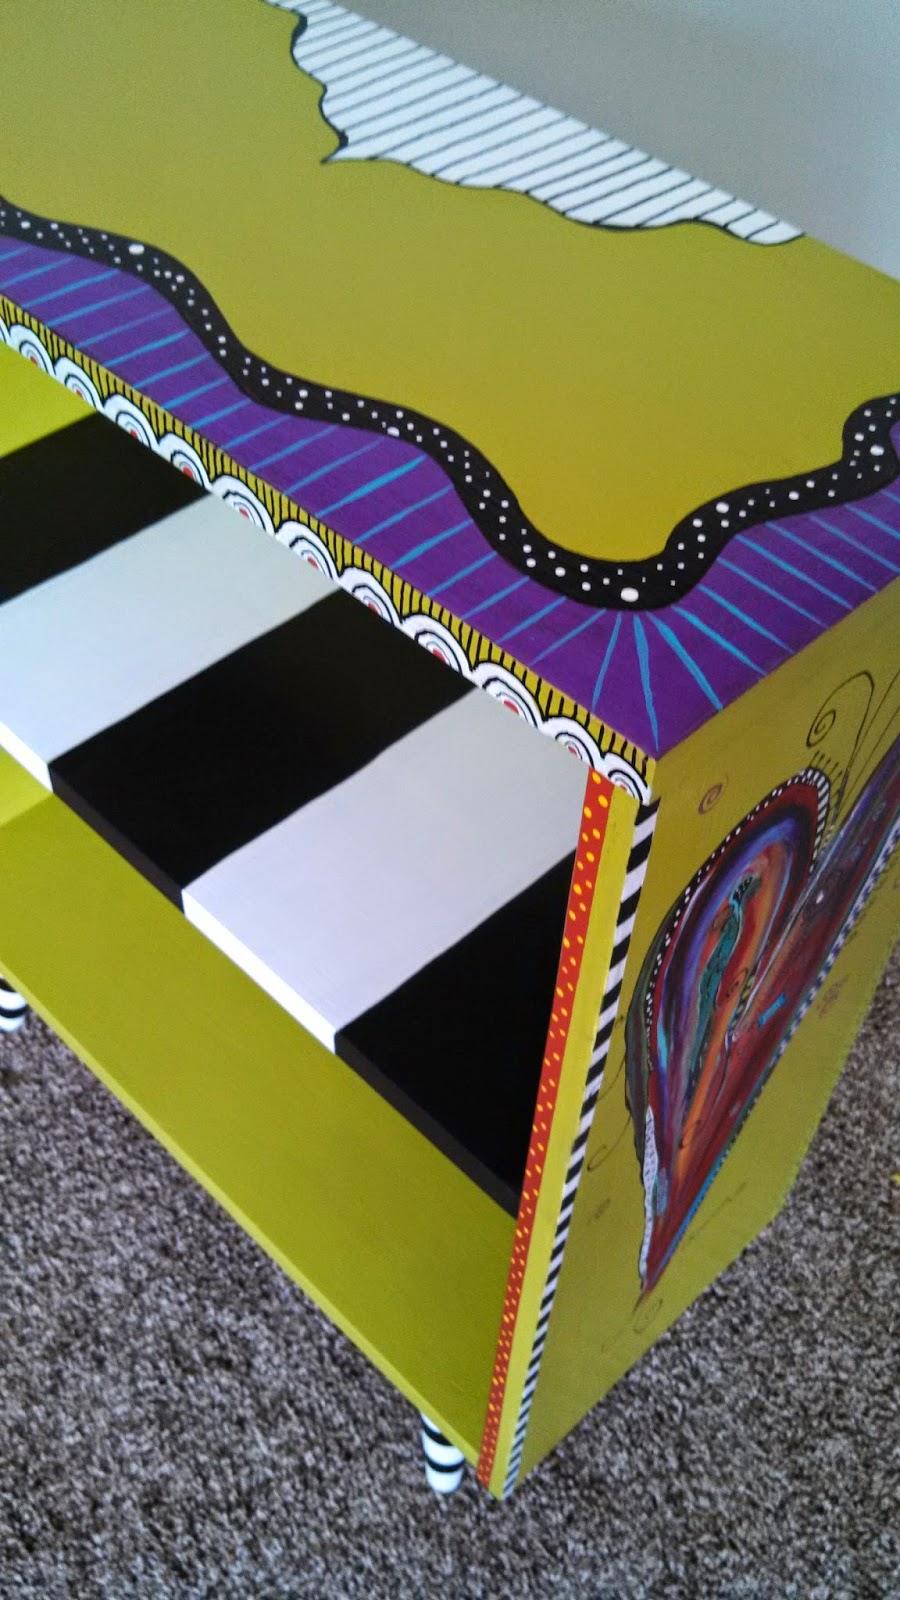
The top band below the black and white stripes is variated. I do that by painting a base color, which in this case is the Bahama Blue, then going back over it with Bahama Blue, but this time picking up ever so often, a little red/violet, and some true blue, and a tiny bit of white. I just pick these colors up, alternately one at a time on the very tip of my brush (just a dot , really) and streak it into the Bahama Blue to get the pretty shading you see.

I did the same thing with the top of the bar. I used primarily the yellow green, and mixed in the other colors. In this case, true, blue, Bahama Blue, red-violet, and a little white.

I painted all the little squares with different designs.

Here is a picture of Aurelia, painting a picture of poppies. No one paints poppies like Aurelia! Can you see the tall armoire in the back, with the painted panels? Funny story. I was painting til sometimes 1 and 2am to get this done. I was staying at Aurelia's while I did it, and she would say every day, "You know those panels would look so good on that armoire if they matched the bar."

I would say, "I don't think I will have enough time to paint them." I wanted to leave by Tuesday. This went on every day, a couple of times a day, and on the third night, I painted the inside panels, the blue you see, but not the trim, because the trim would take a lot of time. She said (like about 5 times), "Oh, you know, wouldn't that look great if the trim matched the bar." Again, I said , "I'm really running short on time." On Tuesday night I finished the painting and by that time knew that I had to stay an extra day to do the polyurethane. I was so excited to be done, my sister drove for 4 hours round trip to come see it. She and Aurelia were in the living room. When I finished the painting, I came in so excited and proclaimed, "I'm done with the painting!!! I am so excited!" Mary Ann, my sister, said " I bet you are tired." "No, I am invigorated! I just want to paint some more!!" Then Aurelia very softly said, "You know, you could paint that trim around those panels.." I laughed til I had tears coming out of my eyes. Of course, you know where I was later that night! I painted the trim for her. :)


I thought about attaching real paint brushes, and how I could attach them. Would that be too much though? My artist friend Kevin was sitting and looking at it one night and he said, "you know what would be cool is if you could put some real paint brushes on there!" That did it! Aurelia produced some old paint brushes the next morning that she was going to throw away. We doctored them up with more color and when it was all done, I glued the brushes in place. It was the perfect crowning touch. Now it was a true artsy piece for her studio.


Now isn't this much better than the boring white? Aurelia is so thrilled with it, and she is so much fun to do a project for. She says, do what you want, because if I tell you what to do, then it will be my project, not yours. She sat and watched so much of the time, telling me which block she loved the best, but NEVER saying "are you going to leave it like that? I don't know if I like that.." Most of my things are a work in progress until they are done..done... I put on the first layers, then go back and forth as I complete different parts, always adding and changing it up. I usually don't like to paint in front of people for that reason. But we had so much fun I didn't want to leave for home.


I hope you have enjoyed my Bar post. What do you think? Do you think it looks better white, or like this? I love to read comments, and remember that you can receive email updates from me by signing up to follow me. Have a wonderful spring and remember "Never put the key to your happiness in someone else's pocket."
Carolyn